Creating a Full-stack Recipe Sharing App
Potluck dev diaries pt. 1
This is an ongoing weekly tutorial series and development diary
In a past life, I worked under a chef at a casino, cooking in all styles from Cantonese to Carribean, Indian to Southern US, and more. There’s a lot of creativity in cooking, and in a way it’s both an art and a science: the science part being that you can create a repeatable series of steps (a recipe), and anyone in the world can reproduce it if they follow it closely.
While there are lots of recipe sharing apps out there (and Pinterest), working closely with a professional chef empassioned me for all things cooking. Why not take this passion and create a learning opportunity from it? I want to build my own recipe sharing app called Potluck, and you can follow along here with everything I do.
As a software engineer, there are still a lot of gaps in my knowledge. Most of the gaps are in the back-end and infrastructure side of things, so I’ll be dedicating a lot of time to those here. I’m not the best engineer in the world, so we’ll be learning a lot of things together.
This diary is meant to serve as both a tutorial series and a, uh, diary for my own progress. To keep these short, I won’t go into 100% detail on what I build. If you’re interested in keeping up in more detail, I’ve posted the full GitHub repository for you to look at and follow along with as I build this.
App Features
The main features I want the app to include are the following:
Create a recipe: Write a little blurb about it, add the ingredients, and add the steps.
Add tags: Make finding a recipe easier (American BBQ, fried, Korean, vegan, etc). This is going to take some finessing on the infrastructure side. Building a search engine is a lot of work.
Rate / save recipes: Add to a list of your favorite recipes or put them in a collection.
Create shopping lists: Input ingredients manually or import everything from a recipe. Add or remove things form the list, like a to-do list. Display the list in a screenshot-able format.
The Tech Stack
Client: Angular
Server: ASP.NET Core Web API
Authentication: OAuth2 OIDC [This part is subject to change]
Database: MsSQL [Also subject to change. I want to experiement with the search feature]
Deployment: Microsoft Azure
These are the technologies I’m fairly familiar with. I’ll admit I know absolutely nothing about deploying an app on Azure, so pls don’t take what I say about cloud computing as gospel.

Let’s get started, shall we?
Setting Up the Client
To get started, I generated a new app with the Command Line Interface (CLI). I’m using Angular 16.
ng new recipe-appAfter generating the app (and checking ‘yes’ for routing and selecing SCSS), I take a look at my new project. Ain’t she a beaut.
In between me generating that and posting this screenshot however, I did some preparations for how I’m going to structure the client (which is noted in the three folders under “app”: core, home, and shared).
Client Architecture
I’m a huge fan of the separation of concerns, so each one of my features gets its own modules. This is how I do things at my day job, where I build software for banks.
Feature and Module Structure
When each feature has its own module, it reduces the load time for each page via what’s known as “lazy-loading”. Currently, the only module I need to lazy-load is the Home feature. The Core and Shared features don’t need to be routed to, because they either are core services needed for the application to function, like authentication, or they are reusable components used by multiple features, like a header or footer. Let’s get this set up.
You can create a module with routing like this:
ng generate module home --routing
// ng g m also works
Creating a component that uses this module is easy, too:
ng generate component home/home -m=home
// ng g c
Routing to the Home Page
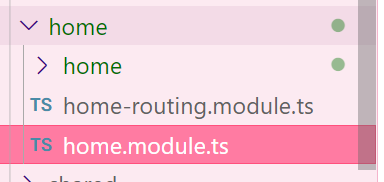
The home feature is set up as such. This will probably serve as a landing page for users who aren’t signed in, to see trending or popular recipes.
Adding this block to the home-routing module will load the home component when the module loads
const routes: Routes = [{
    path: '',
    component: HomeComponent
  }
];
Don’t worry about keeping the path field empty, we’re going to add that in the app-routing module by lazy-loading it (I’ve done this a million times, and, to this day, I STILL have to Google it)
//app-routing.module.ts

const routes: Routes = [{
    path: 'home',
    loadChildren: () => import('./home/home.module').then(m => m.HomeModule)
  }
];
Now, we can add a router-outlet tag to the app-component template file. It should display the home component when we navigate to /home. Huzzah!
Core Module
Core modules are great for adding features you only want to load a single time in your application. Adding these features here prevents you from accidentally loading it somewhere else and unnecessarily increasing tech debt. Secondly, it keeps you from creating duplicate instances where it’s necessary to only have a single one.
But personally, I just like to torture myself.
Logging, error handling and authentication are good examples of this. I’m not setting up the services today, but I wanted to go ahead and get this module in place. To enforce the single-import, we’re going to write in a check to see if the module has already been loaded once. If so, we throw an error:
export class CoreModule {
  constructor(@Optional() @SkipSelf() parent: CoreModule) {
    if (parent) {
      throw new Error(
        'The Core Module has already been loaded. A troupe of trained badgers has been dispatched to your location to deal with you. We are not sorry for any inconvenience.'
      );
    }
  }
}
Shared Module
This is where I throw in features like the header, footer, pipes, directives, or any reusable components. So far, all I’ve added is a simple header. Exporting it will allow you to add it to any component you’re using:
I added in a basic Bootstrap navbar with a searchbar to get started. I can add this to the app component with the tag app-header, but I get an error unless I import the Shared Module into the App Module:
Throwing the navbar into the app component means that it will show up everywhere in the application, and I won’t have to add it to each and every feature:
I made some modifications from the generic Bootstrap navbar. All of this can be found in the Github repo.
End of Week One
You can read week two's post here.
This will be the last thing I do this week. The client is built and set up, but there’s still a lot of work we have to do. Next week, I’m going to get started on the feature to add a new recipe.
Creating a working application is a lot of work. It starts with small steps like this. As my high school English teacher used to say, you have to build a brick house with one brick at a time (but I’m going to be real, that’s the only thing I remember from that class because I slept for way too much of it).
Subscribe to my mailing list to get notified when I release new entries. Hopefully we can learn something together! And don’t forget to check out the Github repo to follow along in more detail.


